A 5th wheel trailer offers plenty of living space inside, but serious RVers know the real magic happens outdoors. Adding a deck to a 5th wheel turns a cramped entryway into a proper outdoor room, a place to cook, entertain, or just sit with morning coffee without balancing on wobbly metal steps. Unlike traditional stick-built decks, 5th wheel decks need to be portable, weather-resistant, and easy to set up and tear down. That means rethinking materials, attachment methods, and construction techniques. Whether someone’s a full-time RVer or a weekend warrior, a well-designed deck makes any campsite feel more like home.
Table of Contents
ToggleKey Takeaways
- A 5th wheel deck transforms cramped entryways into functional outdoor living spaces, improving safety, cleanliness, and quality of life while providing weather-resistant storage for camp gear.
- Wraparound decks maximize space for seasonal campers, while elevated platform decks with storage underneath offer quicker setup for weekend travelers in as little as 30-45 minutes.
- 5th wheel deck designs require modular, portable construction using pressure-treated lumber, galvanized fasteners, and knock-down hardware like bolts instead of permanent connections.
- Essential deck features include railings (required if over 30 inches above grade), non-slip surface treatment, built-in benches, and low-voltage LED lighting for safety and livability.
- A basic 8×10 deck costs $300-$600 for materials; building in phases and choosing pressure-treated lumber over composite decking are effective ways to reduce expenses while maintaining durability.
Why Add a Deck to Your 5th Wheel?
A 5th wheel deck solves several practical problems at once. First, it expands usable living space without modifying the trailer itself. Most 5th wheels have a single-entry door with narrow steps that feel more like an afterthought than a real entrance. A deck creates a stable, level landing that makes getting in and out easier, especially with armloads of gear or groceries.
Decks also provide a clean barrier between the living space and the campsite. They keep dirt, mud, and debris from being tracked inside, which matters when dealing with carpet or vinyl flooring that shows every speck. For full-timers, a deck can double as outdoor storage for bulky items like camp chairs, grills, or firewood.
Safety is another factor. OEM 5th wheel steps can be steep and slippery, especially in rain or frost. A deck with non-slip surface treatment and integrated railings reduces the risk of falls. Some jurisdictions or campgrounds may have accessibility requirements: a properly sized deck can accommodate ramps or wheelchair access where factory steps can’t.
Finally, there’s quality of life. A deck creates a defined outdoor area for dining, socializing, or just stretching out. It’s the difference between eating dinner perched on a picnic table and hosting friends on a proper patio.
Top 5th Wheel Deck Designs to Consider
Choosing the right deck design depends on how the space will be used, how often the rig moves, and what kind of setup time is acceptable. Here are two popular approaches that balance function and portability.
Wraparound Decks for Maximum Space
A wraparound deck extends along two or more sides of the 5th wheel, creating a U-shaped or L-shaped outdoor area. This design works best for seasonal campers or full-timers who stay in one spot for weeks or months at a time. The extra square footage allows for multiple zones, a dining area near the entry door, a lounge space along the side, and maybe a small prep station near the outdoor kitchen (if the rig has one).
Construction typically involves building modular sections that bolt together on-site. Pressure-treated 2×6 or 2×8 joists on 16-inch centers provide adequate support, with decking boards running perpendicular. Because wraparound decks have a larger footprint, they need adjustable leveling legs or blocking to account for uneven terrain. Some builders use galvanized pipe or adjustable deck supports (the kind with threaded rods) to make leveling faster.
One challenge: wraparound decks take longer to set up and tear down. Budget at least an hour for assembly, more if working alone. They’re also heavier, which means more storage space in the truck bed or a dedicated cargo trailer.
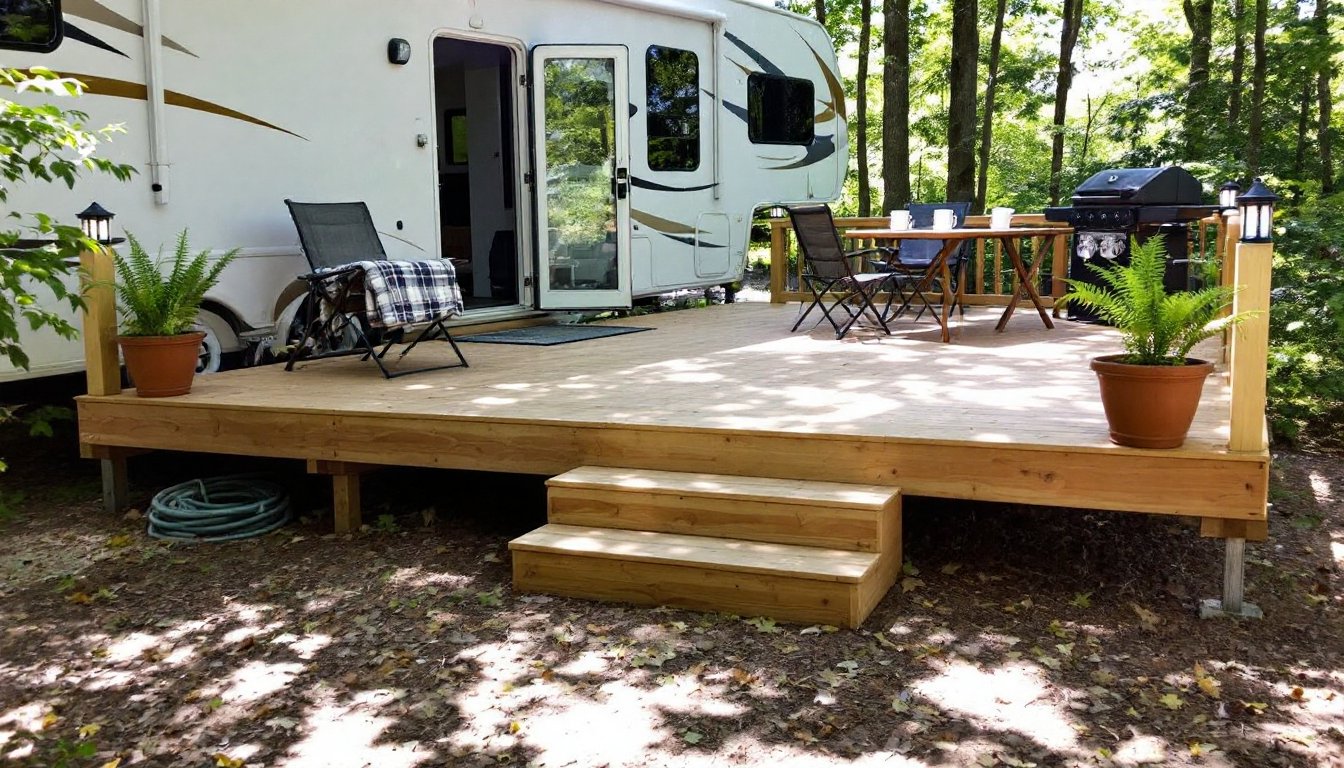
Elevated Platform Decks with Storage Underneath
Elevated platform decks lift the outdoor space 12 to 24 inches off the ground, creating a level surface even on sloped sites. The space underneath becomes valuable storage for camp gear, hoses, leveling blocks, or anything else that doesn’t need to live inside the trailer.
These decks usually attach directly to the 5th wheel frame or landing gear, reducing the need for independent footings. 2×6 or 2×8 pressure-treated lumber forms the frame, with 5/4-inch treated decking or composite boards on top. The key is making sure the attachment points don’t stress the trailer’s frame: consult the 5th wheel’s manual or contact the manufacturer to confirm where load-bearing attachment is safe.
For storage access, some designs include hinged deck panels or removable sections. A 2×4 frame with piano hinges and a simple latch turns part of the deck into a trapdoor. Line the underside with 1/2-inch treated plywood to keep gear from falling through the joists.
Elevated decks work well for weekend campers who want quick setup. With practice, one person can assemble a small platform deck in 30 to 45 minutes. They’re also lighter and more compact when disassembled.
Materials and Construction Tips for 5th Wheel Decks
Material choice comes down to weight, durability, and how much maintenance someone’s willing to do. Pressure-treated southern yellow pine is the most common framing lumber. It’s strong, affordable, and widely available. Nominal 2×6 boards (actual dimensions 1.5″ × 5.5″) are sufficient for joists spanning up to 8 feet: go with 2×8s (1.5″ × 7.25″) for longer spans or if the deck will hold heavy furniture or a hot tub (yes, some RVers do this).
For decking surfaces, 5/4-inch pressure-treated boards (actual thickness around 1 inch) are lightweight and budget-friendly. Space them with a 1/8-inch gap to allow for drainage and expansion. Composite decking is another option, it doesn’t warp or splinter, and it holds up well in sun and rain. The downside is weight and cost. Composite boards can be 30-50% heavier than treated lumber, which adds up when hauling a disassembled deck.
Galvanized or stainless steel fasteners are non-negotiable. Regular screws will rust out in a season or two, especially in coastal or humid climates. Use 2.5-inch exterior-grade deck screws for decking and 3-inch lag screws or structural screws for framing connections. For joints that need to come apart, galvanized carriage bolts with washers and nylock nuts work better than screws.
Portability requires thoughtful joinery. Avoid permanent connections: instead, use bolt-together framing or knock-down hardware like Simpson Strong-Tie ZMAX connectors. Many experienced RV deck builders use a modular approach: build the deck in 4×8 or 4×6 sections that stack flat for transport and bolt together on-site.
Safety warning: Always wear cut-resistant gloves, safety glasses, and hearing protection when cutting treated lumber. Treated wood contains preservatives that can irritate skin and lungs, work outdoors and avoid burning scraps.
Surface prep matters. If using raw treated lumber, let it dry for a few weeks before applying a water-repellent stain or sealer. This extends the wood’s life and improves traction. For composite decking, follow the manufacturer’s guidelines: some products need no finish, while others benefit from a UV protectant.
Consider adding non-slip stair tread tape or textured paint to steps and high-traffic areas. A deck that’s slick when wet is a liability, especially with kids or pets around.
Essential Features to Enhance Your 5th Wheel Deck
A bare platform is functional, but a few thoughtful additions make a 5th wheel deck truly livable. Start with railings. If the deck is more than 30 inches above grade (check local codes, some jurisdictions set the threshold at 24 inches), railings aren’t optional. Use pressure-treated 4×4 posts at corners and every 6 feet along the perimeter, with 2×4 top and bottom rails and 2×2 balusters spaced no more than 4 inches apart (to meet IRC residential deck code). For portability, design railings as removable sections that bolt to the deck frame.
Built-in benches eliminate the need to haul separate furniture. A simple bench uses 2×4 legs and supports with a 2×10 or 2×12 seat. Add a hinged lid and the bench becomes storage for cushions, tools, or outdoor games. Secure benches to the deck frame with lag screws, but make them removable if the deck needs to break down frequently.
Lighting is often overlooked. Low-voltage LED strip lights or solar-powered post caps add ambiance and safety after dark. Route wiring through the deck framing to keep it out of the way. If tapping into the 5th wheel’s 12V system, use marine-grade wire and connectors to prevent corrosion. Always fuse any new circuits and keep total draw within the RV’s electrical capacity.
Shade structures extend usable hours. A simple option is a retractable awning mounted to the trailer’s sidewall: more permanent setups use pressure-treated 4×4 posts and a polycarbonate or fabric canopy. Make sure any overhead structure can be disassembled or folded down for travel.
For those who enjoy woodworking projects with detailed plans, many furniture building tutorials offer adaptable designs that work well for outdoor RV use. Similarly, workshop setup guides can help organize tools and materials for building custom deck features.
Budget-Friendly DIY 5th Wheel Deck Ideas
A basic 8×10 deck can be built for $300 to $600 in materials, depending on lumber prices and whether composite decking or accessories are included. That estimate assumes pressure-treated framing and decking, galvanized fasteners, and no railings. Add another $150 to $250 for railings, and $50 to $100 for stain or sealant.
To keep costs down, consider using recycled or reclaimed lumber for non-structural elements like bench seats or planter boxes. Check local building supply yards for culled or slightly warped boards sold at a discount: these are fine for decking if properly spaced and fastened. Just avoid anything with large knots, splits, or rot.
Pallet wood is tempting but risky. Most pallets aren’t treated for ground contact and will rot quickly. If using pallet wood, limit it to decorative trim or vertical elements that stay dry. Never use it for framing or structural support.
Another cost-saver: build in phases. Start with a simple platform deck, then add railings, benches, or lighting as budget allows. A modular design makes this easy, each section can be upgraded independently.
For detailed step-by-step builds, DIY project tutorials offer community-tested plans for portable decks and outdoor structures. These resources often include材料 lists, cut diagrams, and assembly tips that translate well to 5th wheel applications.
Tool alternatives: A circular saw with a speed square or straightedge works for most cuts, though a miter saw makes quick work of repetitive angle cuts for railings. A cordless drill is essential: invest in a impact driver for driving deck screws, it’s faster and less likely to strip heads. For leveling, a 2-foot or 4-foot spirit level is more practical than a laser in outdoor settings.
Finally, don’t skip the prep work. Measure the 5th wheel’s door height and clearance before committing to a deck height. Test-fit framing sections before final assembly. Most DIY deck failures come from skipping measurements or assuming the ground is level when it’s not. A little extra time upfront prevents frustration and wasted materials later.