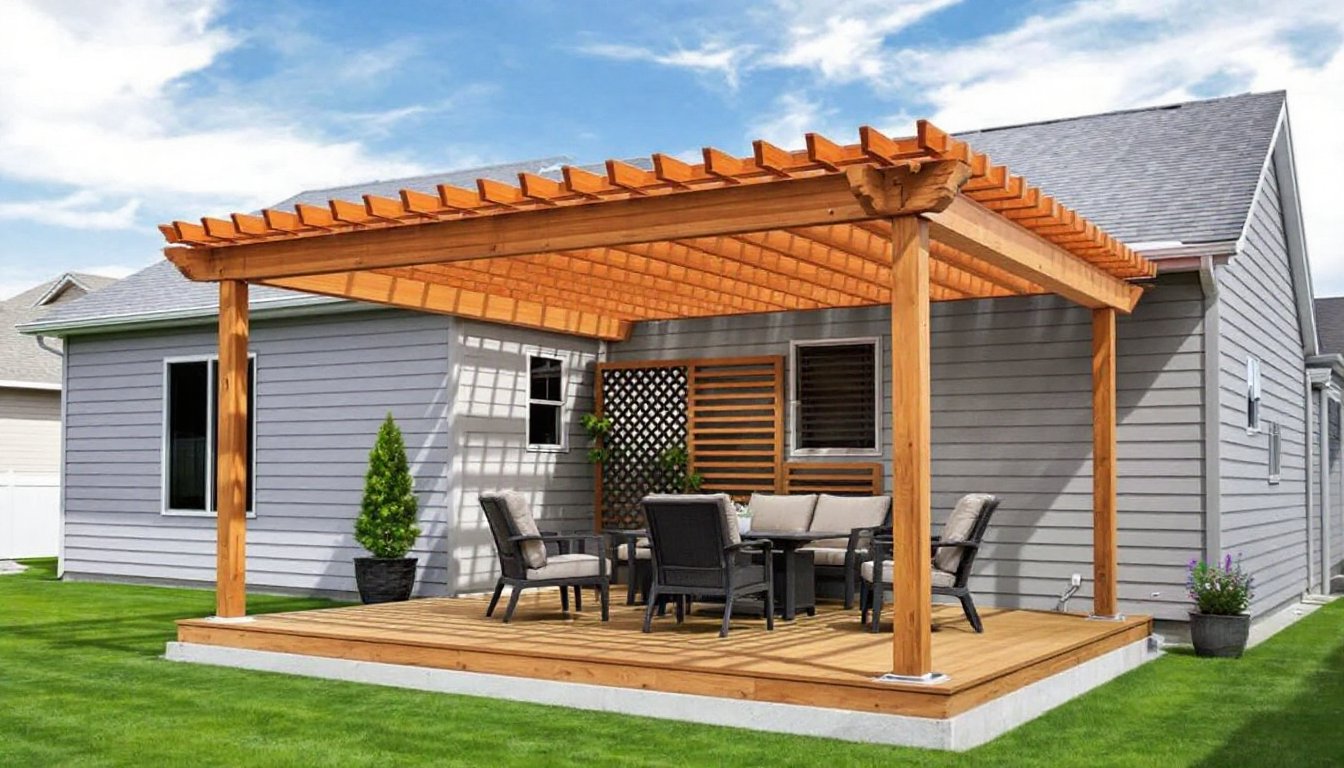
Attached pergolas deliver shade, style, and usable outdoor space without the footprint of a detached structure. By anchoring to an existing wall or roofline, they extend living areas into the yard, create defined zones for dining or lounging, and often cost less than standalone pavilions. They’re popular for good reason: you gain instant architectural interest and weather protection while working within a smaller budget and footprint. Whether you’re aiming for a cozy retreat off the kitchen or a bold entertainment deck, attached pergolas adapt to almost any home style and lot size.
Table of Contents
ToggleKey Takeaways
- Attached pergolas provide cost-effective shade and outdoor living space by anchoring to an existing wall or roofline, reducing material costs compared to standalone pavilions.
- Proper ledger-board attachment into wall studs with ½-inch lag screws every 16 inches is critical for structural safety and must include flashing to prevent moisture damage.
- Attached pergola designs range from traditional wooden gable roofs in cedar or pressure-treated pine to modern aluminum louvers and composite materials requiring minimal maintenance.
- Plan for below-frost-line footings (12 to 48 inches depending on climate) with concrete footings and galvanized post bases to prevent rot and settling.
- Most jurisdictions require building permits for attached pergola structures over 120–200 square feet or when bolted to the house, so verify local codes before starting construction.
- DIY attached pergola projects can cost $600–$900 for a 10×12-foot build using basic materials, while prefab kits and premium systems range from $800 to $8,000 depending on features and materials.
What Is an Attached Pergola and Why Should You Build One?
An attached pergola connects directly to a house, garage, or outbuilding along one side, sharing at least one structural element, typically a ledger board bolted to a wall or fascia. The opposite side rests on free-standing posts. This hybrid design simplifies layout, reduces material costs, and often eliminates the need for two extra posts.
Key benefits include:
- Instant shade near doorways, protecting furniture and lowering cooling costs.
- Simplified framing: the ledger anchors one end, so you’re only setting posts on the open side.
- Visual cohesion: matching roofline angles or siding materials ties the pergola into the home’s existing architecture.
Before breaking ground, verify whether your jurisdiction classifies attached pergolas as accessory structures requiring a building permit. Most codes treat them as permanent improvements if they’re lag-bolted into wall studs or attached above a certain square footage. Check local setback requirements, especially if posts land near property lines.
Classic Wooden Attached Pergola Designs
Pressure-treated pine and cedar dominate traditional builds for their workability, availability, and rot resistance. Cedar weathers to a silvery patina: pressure-treated lumber accepts stain once dry.
Traditional Gable-Roof Pergolas
A gable design matches most ranch and colonial home rooflines. The ledger mounts below the eave, and rafter tails extend beyond the beam to echo soffit overhangs. Use 2×6 or 2×8 rafters spaced 16 or 24 inches on center, depending on snow load. In regions with heavy snow, consult local load tables or an engineer.
Flat-Top Cedar Pergolas
Flat-slatted roofs suit mid-century and contemporary homes. Space 2×4 or 2×6 slats 12 to 18 inches apart for dappled shade, or tighten spacing to 6 inches for deeper cover. Run slats perpendicular to the house so water drains away from the wall. Seal all end-grain cuts with exterior wood sealer to prevent moisture wicking.
Tip: Actual dimensions matter. A nominal 4×4 post measures 3.5 × 3.5 inches: plan your hardware and lag-bolt lengths accordingly.
Modern Metal and Composite Pergola Ideas
Metal and composite materials require less maintenance and deliver clean, contemporary lines.
Aluminum Louvered Pergolas
Extruded aluminum louvers pivot to control sun and rain. Many kits attach via a wall-mounted track, eliminating the traditional ledger board. These systems cost more, expect $3,000 to $8,000 for a 10 × 12-foot unit, but they’re nearly maintenance-free and integrate LED strips and drainage channels.
Steel-Frame Pergolas with Polycarbonate Panels
Powder-coated steel posts and beams paired with corrugated polycarbonate roofing create weather-tight coverage. Polycarbonate blocks UV while transmitting diffused light. Fasten panels with neoprene washers to allow thermal expansion. Steel frames typically require concrete footings below frost line and may need an engineer’s stamp in high-wind zones.
Composite-Lumber Hybrids
PVC or capped-composite beams resist rot and insects without staining. Pair them with steel post bases for a mix of modern durability and wood-like aesthetics, an approach popular in homes focused on outdoor entertaining. Composite expands and contracts more than wood: follow manufacturer fastener specs and leave expansion gaps.
Attached Pergolas with Built-In Features
Integrating extras during construction saves retrofit headaches later.
Retractable Shade Canopies
Track-mounted shade sails or retractable fabric systems slide along cables tensioned between rafters. Marine-grade fabrics (solution-dyed acrylic) resist fading and mildew. Install eyebolts into rafter ends and tension with turnbuckles. Pull the canopy during storms to prevent tearing.
Built-In Lighting and Electrical
Run low-voltage cable (12 V or 24 V) through routed channels in beams before assembly. Surface-mount junction boxes on posts for sconces or ceiling fans. Any 120 V wiring must follow NEC guidelines: use weatherproof boxes, GFCI protection, and conduit where exposed. Hire a licensed electrician if you’re unfamiliar with outdoor wiring or local codes require it.
Privacy Screens and Planters
Bolt lattice panels or horizontal slat screens to the open sides. Space 1×2 slats 2 inches apart for airflow and partial privacy. Mount planter boxes to post faces using lag screws into blocking: ensure boxes have drainage holes. Climbing vines on wire trellises soften the structure and boost shade over time.
Planning Your Attached Pergola: Key Considerations
Ledger-Board Attachment
The ledger carries half the roof load, so it must fasten into wall studs or a solid rim joist, never siding alone. Strip siding back to sheathing, flash the top edge with Z-flashing or a drip cap, then bolt the ledger with ½-inch lag screws or through-bolts every 16 inches. Use stainless or hot-dipped galvanized fasteners to prevent corrosion.
Post Footings and Frost Depth
Dig post holes below your region’s frost line, typically 12 inches in warm climates, 36 to 48 inches in northern zones. Pour concrete footings and embed galvanized post bases before the mix sets. Elevating wood posts above grade prevents rot. Check your local building department for required footing diameter and depth.
Roof Pitch and Drainage
Slope the pergola roof away from the house at least ¼ inch per foot to shed water. If you’re adding solid panels, install gutters along the outer beam to prevent splashback onto siding. Improper drainage can wick moisture into wall cavities and cause rot.
Permits and Inspections
Most jurisdictions require permits for structures over 120 to 200 square feet or anything bolted to the house. Submit a site plan showing setbacks, a framing diagram with member sizes, and details on ledger attachment. Inspectors typically review footings before backfill and framing before roofing. Skipping permits can complicate insurance claims and resale.
Budget-Friendly DIY Attached Pergola Projects
Simple 2×6 Rafter Pergola
For a 10 × 12-foot footprint, budget around $600 to $900 in materials: pressure-treated 4×4 posts, a 2×8 ledger, 2×6 rafters, concrete, and hardware. Cut rafter tails with a decorative profile using a jigsaw, simple curves or angled ends add style without cost. Stain or seal all lumber before assembly to reduce maintenance.
Pallet-Wood Shade Slats
Reclaimed pallet boards (heat-treated, not chemically treated) make inexpensive slats. Remove nails, plane smooth, and cut to uniform lengths. Space them 8 to 12 inches apart across 2×6 rafters. Sand rough edges and apply exterior stain. This approach works for cantilevered designs where slats cantilever past the beam.
Kit Upgrades
Prefab pergola kits range from $800 to $3,000. Many include pre-cut beams, brackets, and assembly instructions. Upgrade kits by adding your own lattice sides, staining to match trim, or routing cable channels for string lights. Kits simplify layout but may use lighter lumber than custom builds: verify beam and post dimensions meet your snow and wind loads.
Safety note: Wear safety glasses, work gloves, and hearing protection when cutting lumber. Use a miter saw for clean angle cuts on rafters: a circular saw works but requires careful marking. Rent an auger for post holes if you’re digging below 24 inches in clay or rocky soil.
Conclusion
Attached pergolas blend function, beauty, and budget-conscious design. Whether you choose traditional cedar, low-maintenance aluminum, or a DIY pallet project, proper ledger attachment, code-compliant footings, and thoughtful drainage ensure years of outdoor enjoyment. Plan thoroughly, secure permits where required, and don’t skip the flashing, your walls will thank you.