Swapping out vanity hardware ranks among the fastest, cheapest ways to refresh a bathroom, no demo required. A few new pulls or knobs can shift the entire look from builder-grade to custom in under an hour. Yet many homeowners stick with whatever came installed, missing an easy win that costs less than a tank of gas. The right hardware doesn’t just look good: it improves daily function, especially on drawers that see constant use. This guide covers finish options, style pairings, installation tricks, and budget-friendly swaps that deliver maximum impact with minimal effort.
Table of Contents
ToggleKey Takeaways
- Swapping bathroom vanity hardware is one of the fastest and cheapest upgrades available, costing just $20–$60 for a standard vanity and taking under an hour to install with only a screwdriver.
- Classic finishes like brushed nickel and oil-rubbed bronze offer timeless appeal, while modern options like matte black and champagne bronze provide trendy, contemporary aesthetics for any bathroom style.
- Match your bathroom vanity hardware finish to your cabinet color: matte black and chrome suit light vanities, warm metallics complement natural wood, and polished nickel pops against dark cabinetry.
- Horizontal bar pulls visually widen small bathrooms and offer better grip than knobs, while vertical pulls elongate narrow spaces—mixing pulls on drawers with knobs on doors is both functional and stylish.
- Budget-conscious homeowners can save money by purchasing hardware in bulk, spray-painting existing pieces, using template jigs to avoid drilling mistakes, or sourcing unique vintage hardware from salvage shops and estate sales.
Why Vanity Hardware Is the Easiest Bathroom Upgrade
Most vanity hardware installs with a single screw from behind the drawer front or door, making replacement a straightforward swap. Homeowners need only a screwdriver, usually a Phillips head, and five minutes per piece. Unlike faucet changes that involve plumbing or tile work that demands grout and mortar, hardware sits entirely on the surface.
The visual return outweighs the effort by a wide margin. New pulls or knobs create a focal point at eye level, where hands interact dozens of times daily. That repetition means even subtle upgrades register quickly. A dated brass pull replaced with matte black or brushed nickel can modernize the whole vanity without touching paint or countertops.
Hardware also costs less than most assume. Quality pieces run $3–$15 each, so outfitting a standard two-door, two-drawer vanity totals $20–$60 in materials. Compare that to a new mirror ($150+), light fixture ($100+), or vanity top ($300+), and the value becomes obvious. For renters or flippers, hardware delivers comparable aesthetic lift with zero permanent alteration.
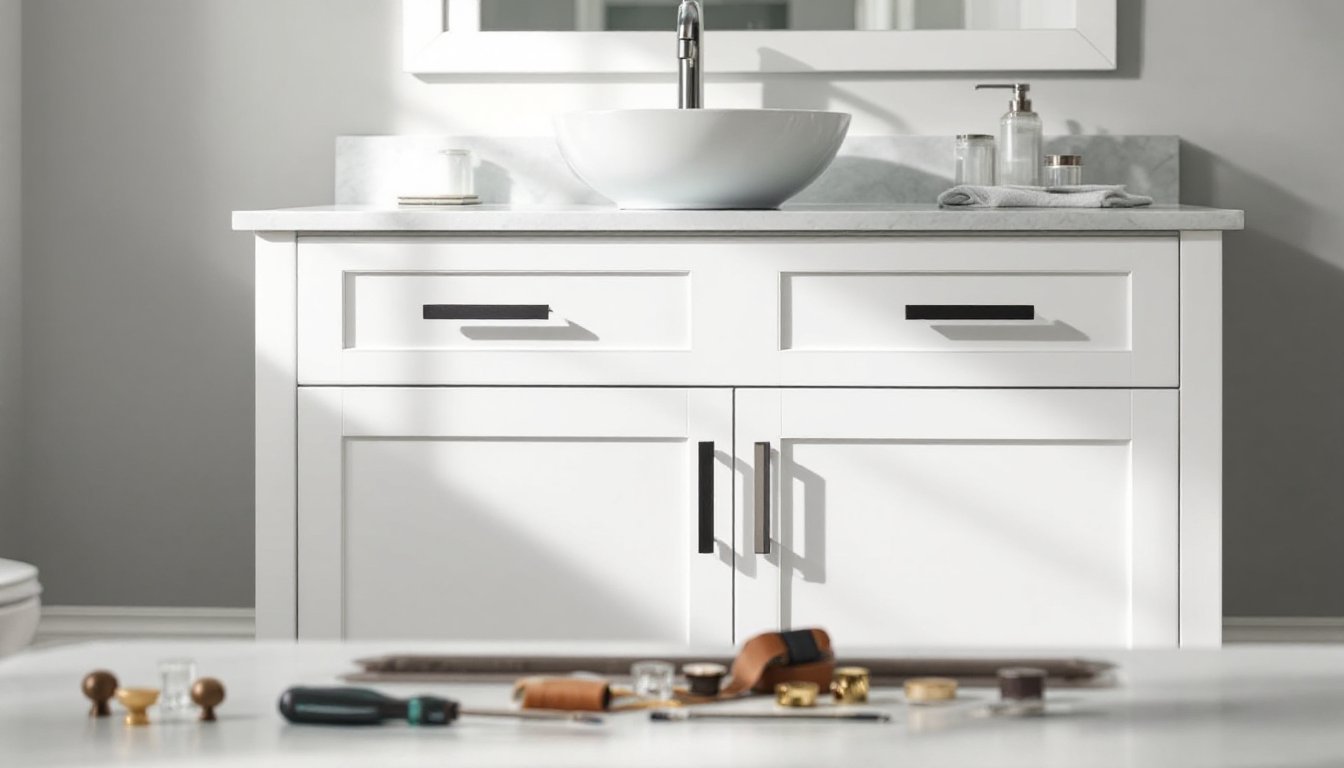
Classic Hardware Finishes for Timeless Bathroom Vanities
Brushed nickel remains the workhorse finish in bathrooms. Its soft, satin sheen hides fingerprints and water spots better than polished chrome, and it pairs with virtually any faucet or light fixture. Builders default to brushed nickel for good reason, it ages gracefully and complements both warm and cool color palettes.
Oil-rubbed bronze (ORB) offers depth and contrast, especially against white or light-colored cabinetry. The dark, almost black base with bronze highlights adds traditional character without feeling stuffy. ORB does show water marks more readily, so it suits powder rooms or vanities that don’t see heavy splash. Be aware that ORB finishes can vary widely between manufacturers: some lean greenish, others nearly black. Order samples if color consistency with existing fixtures matters.
Polished chrome delivers a mirror-like, high-gloss look that feels crisp and clean. It’s a natural match for contemporary and transitional bathrooms, though it demands more frequent wiping to maintain shine. Chrome hardware typically costs less than specialty finishes, making it budget-friendly for larger projects.
Polished brass and unlacquered brass have surged in popularity as homeowners seek warmer metallics. Polished brass stays bright and shiny with a protective lacquer coat, while unlacquered brass develops a living patina over time. The latter requires acceptance of tarnish and oxidation, some love the evolving character, others prefer the low-maintenance consistency of lacquered versions.
Modern and Trendy Hardware Styles to Consider
Matte black has become the go-to for modern and industrial aesthetics. Its flat, non-reflective surface reads sleek and intentional, especially when paired with white shaker cabinets or concrete-look countertops. Matte black hardware works across a range of profiles, simple bar pulls, T-pulls, and minimalist knobs all translate well. The finish does show dust and oils, so it’s best suited to bathrooms where a quick wipe-down fits the cleaning routine.
Champagne bronze and brushed gold split the difference between traditional brass and contemporary matte finishes. These warm metallics add richness without the high shine of polished brass. They’ve gained traction on design-focused platforms that emphasize understated luxury. Champagne bronze leans slightly pink-gold, while brushed gold skews more yellow: check samples in your actual bathroom lighting before committing.
Acrylic and glass knobs inject a vintage or glam vibe, reminiscent of mid-century vanities and Art Deco bathrooms. Clear acrylic gives a floating, almost invisible effect, while colored glass (emerald, sapphire, amber) makes a bold statement. These materials pair best with traditional or eclectic styles and can feel out of place in minimalist spaces. Installation is identical to metal knobs, though care during tightening prevents cracking.
Leather-wrapped pulls and mixed-material hardware (wood inlays, ceramic inserts) have appeared in higher-end custom builds. They’re niche and harder to source, but they offer texture and tactile interest that plain metal can’t match. Maintenance varies, leather may need occasional conditioning, and wood inserts should avoid prolonged moisture exposure.
Matching Hardware to Your Vanity Style and Color
White or light-painted vanities offer the widest latitude. Matte black creates high contrast and modern edge, while brushed nickel or chrome keeps things airy and neutral. Oil-rubbed bronze or brushed gold adds warmth and can tie in with existing lighting or mirror frames. If the vanity is the only white element in a room full of wood or color, match hardware to other fixtures to unify the space.
Dark or espresso vanities benefit from hardware that doesn’t disappear. Polished chrome, brushed nickel, or champagne bronze all pop against dark wood or painted cabinets. Matte black can work but risks blending in unless the profile is substantial, think chunky bar pulls rather than slender knobs. Avoid oil-rubbed bronze on very dark vanities: the contrast becomes muddy rather than crisp.
Natural wood vanities (oak, walnut, teak) pair beautifully with warm metallics like brushed brass, champagne bronze, or black iron. These finishes echo the organic character of wood grain without competing. Polished chrome or bright nickel can feel jarring unless the rest of the bathroom leans contemporary. Leather-wrapped or wood-inlaid hardware deepens the natural material story but requires more upkeep.
Two-tone or colorful vanities (navy, sage, charcoal) allow for playful or bold hardware choices. Brass and gold tones complement jewel tones like emerald or navy, while matte black grounds brighter hues. If the vanity color is a statement piece, keep hardware simple in profile to avoid visual clutter. Conversely, a subtle vanity color can support more decorative or textured hardware.
Creative Placement and Configuration Ideas
Horizontal bar pulls on drawers create clean lines and make small vanities feel wider. Standard placement centers the pull horizontally and vertically, but offset mounting, closer to the top edge of the drawer front, can add a custom touch. For wide drawers (24 inches or more), consider dual pulls spaced symmetrically. This improves balance and distributes pull force, reducing stress on drawer slides.
Vertical pulls on cabinet doors elongate the visual line, useful in tight bathrooms with low ceilings. Place them along the outer edge of each door (near the hinge side looks awkward). If doors are inset rather than overlay, ensure the pull doesn’t interfere with the frame when opening.
Knobs vs. pulls comes down to both style and function. Knobs suit traditional and transitional looks, but pulls offer better grip, especially for drawers packed with toiletries or hair tools. Mixing knobs on doors and pulls on drawers is common and works well, just keep the finish consistent unless deliberately creating a mixed-metal look.
Backplates and rosettes add another layer of detail, especially on vanities with visible seams or old hardware holes that don’t align with new pieces. A backplate covers old damage and creates a more finished, furniture-like appearance. This trick works particularly well when updating vintage-style vanities or covering wear from years of use.
Asymmetrical or off-center placement can work on modern, slab-front vanities where no rail-and-stile framework dictates positioning. Mounting a single pull near the top corner of a drawer or door creates an unexpected, contemporary look. This approach requires confidence and careful measuring, asymmetry only reads as intentional when it’s precise.
Budget-Friendly DIY Hardware Swaps
Measure twice, order once. Most vanity hardware uses standard 3-inch or 3.75-inch center-to-center spacing for pulls, and single-hole mounting for knobs. Measure the distance between existing screw holes before ordering. If the new hardware doesn’t match, you’ll need to drill new holes or use backplates to cover old ones. Drilling through laminate or wood veneer requires a sharp bit and painter’s tape over the entry point to prevent chipping.
Shop bulk or open-box options. Big-box stores and online retailers often discount hardware in multipacks or sell returned items at a fraction of the cost. Ten identical pulls can run $30–$50 in a bundle versus $8–$12 each individually. Check for finish consistency and ensure all necessary screws and backplates are included.
Spray-paint existing hardware if the profile and size work but the finish doesn’t. Remove all pieces, clean with degreaser, lightly sand, then apply metal-specific primer and paint. Rustoleum Oil-Rubbed Bronze or Krylon Brushed Metallic sprays yield convincing results for a few dollars per can. This works best on simple, non-textured hardware: intricate details can trap paint and look gummy. Clear coat with a matte or satin topcoat for durability.
Salvage or repurpose vintage hardware. Architectural salvage shops, estate sales, and online marketplaces often sell unique pulls and knobs at low prices. Brass or glass pieces may need polishing or new screws, but the character outweighs the effort. Verify that mounting hardware fits standard hole spacing or be prepared to drill. Mixing one or two statement vintage pieces with new matching hardware can create a collected, eclectic look without full commitment.
Use template jigs for new holes. If drilling fresh holes, a hardware template jig (under $15 at most home centers) ensures accurate, level placement. Clamp it to the drawer or door, drill through the guide holes, and repeat. This prevents the common DIY mistake of slightly off-center pulls that make the whole vanity look crooked. Always drill from the front face and use a backer board behind to avoid blowout on the backside.
Conclusion
Vanity hardware punches well above its weight in bathroom upgrades. The project takes minimal time, requires no specialized tools, and costs a fraction of other cosmetic changes. Whether leaning into trending finishes seen on home design outlets or sticking with timeless classics, the key is intentional pairing with the vanity’s style and the room’s overall palette. Measure carefully, don’t skip the template jig, and remember that a few well-chosen pulls can shift a builder-basic bath into something that feels custom and considered.