
Turning a bedroom into a photoshoot backdrop doesn’t require a professional studio, just smart preparation and creative thinking. Whether someone’s shooting personal portraits, content for social media, or testing photography skills, the bedroom offers controlled lighting, privacy, and endless styling possibilities. The key is understanding how to manipulate light, compose scenes intentionally, and work within the space’s limitations. This guide walks through practical setups, prop strategies, and technical adjustments that transform an ordinary bedroom into a compelling photoshoot location.
Table of Contents
ToggleKey Takeaways
- Bedroom photoshoot ideas succeed by decluttering, assessing natural light direction, and creating 2-3 distinct shooting zones to work efficiently within your space.
- Golden hour and overcast daylight provide the most flattering natural light for bedroom photography, while sheer curtains and DIY scrims control harsh midday sun.
- Layered styling with intention—using florals, vintage finds, books, and personal items—transforms an ordinary bedroom into a compelling photoshoot backdrop without looking staged.
- Flattering angles and poses come from shooting slightly above eye level, using diagonal body positioning, and following the rule of thirds to avoid stiff, centered framing.
- Shoot in RAW format and use post-processing to correct white balance, enhance exposure, and apply subtle retouching that preserves natural texture over airbrushed perfection.
Setting the Stage: Preparing Your Bedroom for a Photoshoot
Declutter ruthlessly. Remove visible laundry, cords, charging cables, and personal items that don’t serve the shot’s story. A clean nightstand with one or two intentional objects reads better on camera than a crowded surface.
Assess the lighting baseline. Note which direction windows face and how light moves through the room at different times. North-facing windows provide consistent, diffused light all day: east- and west-facing windows offer dramatic golden hour opportunities but require timing.
Check the background. Stand where the camera will be positioned and scan for distractions, outlet covers, switch plates, baseboards that need touch-up paint, or popcorn ceilings that photograph poorly. A fresh coat of neutral paint or a temporary fabric backdrop can solve problem walls without permanent changes.
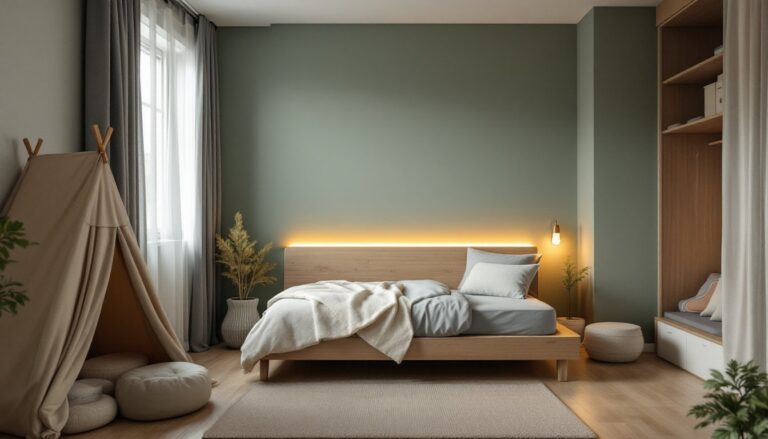
Adjust bedding and textiles. Wrinkled sheets and lumpy comforters kill the aesthetic. Steam or iron linens beforehand, and tuck fitted sheets tightly to avoid bunching. Layering textures, linen duvet, knit throw, velvet pillows, adds depth without clutter.
Create shooting zones. Identify 2-3 distinct areas: the bed as the primary zone, a chair or floor corner for variety, and a window-adjacent spot for backlit or silhouette shots. This planning prevents scrambling mid-shoot and keeps the session efficient.
Natural Light Photoshoot Ideas for Dreamy Bedroom Shots
Golden hour glow is non-negotiable for soft, warm tones. Shoot within 90 minutes of sunrise or sunset when light streams horizontally through windows. Position the subject perpendicular to the window, not facing it directly, to avoid harsh shadows under the eyes.
Overcast days produce natural softbox conditions. Cloudy weather diffuses sunlight evenly, eliminating hard shadows and providing flattering, even coverage. This is ideal for close-up portraits and detail shots of props or hands.
Sheer curtain diffusion works when direct sunlight is too intense. White or cream sheers soften midday light without blocking it entirely, creating a luminous, airy effect. For tighter control, hang a white bedsheet over the curtain rod as a DIY scrim.
Backlit silhouettes require placing the subject between the camera and a bright window. Expose for the highlights (the window), which renders the subject as a dark outline. This works for profile shots, seated poses, or figures draped in fabric.
Window-side reading nook setup uses a chair, stool, or floor cushion positioned at a 45-degree angle to the window. Add a book, mug, or journal as a natural prop. The side lighting creates dimension and prevents flat, washed-out skin tones, a technique often highlighted in room design concepts for maximizing natural light.
Cozy and Intimate Bedroom Photography Concepts
Bed nests are built by piling pillows, throws, and blankets into an inviting cocoon. The subject sits or reclines in the center, surrounded by layers. Shoot from above at a 45-degree angle to capture the setup’s full scope.
Morning coffee in bed requires a tray, neutral ceramic mug, and minimal distractions. Position the tray off-center on the duvet, and have the subject hold the mug naturally, not posed like an ad. The steam (real or added in post) sells the moment.
Barefoot floor shots work on hardwood, area rugs, or even shag carpet. Capture feet peeking out from under bedding, toes on a textured rug, or legs crossed while sitting on the floor. These detail-focused shots add variety without requiring a full outfit change.
Reading or journaling scenes ground the image in a relatable activity. Use real books, no blank journals that scream “stock photo.” Natural hand placement and slightly downcast eyes create authenticity.
String light ambiance adds warmth to evening or low-light shoots. Drape warm white LED string lights (not cool blue-toned) along a headboard, wall, or ceiling. Set the camera’s white balance to tungsten or 3200K to maintain the glow without orange oversaturation. This approach aligns with decorating strategies that emphasize layered, personalized lighting.
Creative Prop and Styling Ideas to Elevate Your Bedroom Photos
Florals and greenery introduce color and organic shapes. A single stem in a glass bottle reads cleaner than a full bouquet. Eucalyptus, pampas grass, or fern fronds suit minimalist setups: peonies and roses lean romantic.
Vintage or thrifted finds add character without looking staged. Brass candlesticks, ceramic pitchers, or woven baskets from secondhand shops provide texture and story. Avoid anything mass-produced or overtly branded.
Books as stacking elements work beyond reading props. Stack 3-5 hardcovers beside the bed, on a windowsill, or under a plant. Choose covers with neutral spines or turn them backward for a monochrome look.
Fabric draping softens hard edges. Hang linen or muslin from a curtain rod, bedpost, or tension rod for a flowing backdrop. A 6-foot by 9-foot canvas drop cloth ($10-15 at hardware stores) works as affordable, wrinkle-resistant drapery.
Personal items with intention ground the shoot in reality. A guitar leaning against the wall, a worn quilt, or a framed photo (face-down if privacy matters) suggests the subject actually lives there. This principle mirrors DIY decor projects that prioritize authenticity over showroom perfection.
Mirrors for depth reflect light and create the illusion of more space. Position a floor mirror or handheld vanity mirror to bounce window light onto the subject’s face or double the visual interest of a styled corner.
Pose and Angle Tips for Flattering Bedroom Photography
Shoot from slightly above eye level to elongate the subject and avoid unflattering chin angles. A tripod with an adjustable center column or a stool for the photographer solves this without awkward bending.
Avoid dead-center framing. Use the rule of thirds: position the subject’s eyes or body along the intersecting lines of an imaginary 3×3 grid. Most cameras and phones display this grid in settings.
Create diagonal lines with body positioning. A straight-on, squared-shoulders pose flattens the frame. Instead, angle the torso, cross legs, or shift weight to one hip for dimension.
Hands need purpose. Resting a hand on the face, running fingers through hair, or holding a prop prevents stiff, dangling arms. Avoid clenched fists or fingers splayed wide.
Sitting and reclining angles change the mood. Sitting upright with legs bent suggests energy: reclining on one elbow reads casual. Lying flat works for overhead shots but rarely flatters from side angles.
Use a longer focal length if the camera allows. A 50mm or 85mm lens (or the telephoto option on a smartphone) compresses space and creates pleasing bokeh (background blur). Wide-angle lenses distort proportions, especially close-up.
Eyes and expression carry the shot. Looking directly at the camera creates connection: looking away or down evokes introspection. A soft, relaxed jaw prevents tension that reads on camera.
Editing and Final Touches for Professional-Looking Results
Shoot in RAW format if the camera supports it. RAW files retain more data than JPEGs, allowing greater flexibility in exposure, white balance, and shadow recovery during editing. Most mirrorless cameras and even some smartphones offer RAW capture.
White balance correction fixes color casts from mixed lighting. If warm artificial light and cool window light compete, adjust the temperature slider until skin tones look neutral. A gray card or white sheet of paper shot in the same light provides a reference point for one-click correction.
Exposure and contrast adjustments bring out detail. Slightly underexposed RAW files recover more cleanly than overexposed ones. Increase shadows and decrease highlights to balance dynamic range, then add contrast to prevent a flat, washed-out look.
Crop for composition. Remove distracting edges, tighten the frame, or correct a tilted horizon. Maintain aspect ratios appropriate for the platform, 4:5 for Instagram feeds, 16:9 for horizontal displays.
Subtle skin retouning addresses blemishes without airbrushing. Use a healing brush or clone stamp tool sparingly. Over-smoothing removes texture and makes the image look artificial.
Presets and filters speed up workflow but require customization. A preset built for outdoor light won’t suit a dim bedroom scene. Adjust opacity or tweak individual sliders after applying a preset. Free editing apps like Snapseed (mobile) or GIMP (desktop) offer robust tools without subscription costs, a practical choice for budget home renovation stories and DIY content creators.
Export at appropriate resolution. For web use, 1920px on the long edge at 72 DPI balances quality and load speed. For prints, export at 300 DPI at the desired print size.
Conclusion
A bedroom photoshoot doesn’t demand expensive gear or elaborate sets, just intentional preparation, smart use of available light, and thoughtful composition. Master the fundamentals of window light, prop styling, and flattering angles, and the results rival professional studio work. The next time someone scrolls through their camera roll, they’ll have images worth keeping, not deleting.